
1.2 Install and run Teloa
Teloa can run directly on your computer or inside containers. Both options use the existing Web interface in your browser. The difference is where tools execute and which files and programs they can access.
Choose a runtime
- Native source installation · Available today: the application and Harness run in local Node.js, with Docker PostgreSQL by default. Use this for daily development and local files and programs. Follow Local development to start.
- Docker Compose · Available today: the application, Harness, and database all run in containers. Use this for optional server deployment and isolated tests. It currently builds from source; follow the steps below.
- Native npm installation · Planned: intended for individuals and OPCs installing without a source checkout. The application and Harness will run natively, with Docker PostgreSQL by default. Not yet released.
Choose a native runtime when you need to call programs installed on your computer. A shell inside a container runs container programs. Mounting a folder provides file access, not control of native applications. A remote server also has no automatic access to files on your personal computer.
Planned npm installation
The npm installer will provide installation and lifecycle commands for the existing open-source Web edition. You will continue working in your browser. The plan runs Teloa and the Harness natively, with PostgreSQL managed by Docker by default or an existing local PostgreSQL instance. The existing-database option is planned for a dedicated local teloa database, not arbitrary remote databases.
The installer has not been implemented or published, so no npm installation command is provided yet. For native execution today, follow Run from source. Every option requires your own model service and API key. Native installation retains tool permissions, working-directory restrictions, and approvals; desktop or browser actions require separate tool integrations.
Run with Docker Compose
These steps run Teloa and PostgreSQL in containers, with data stored in persistent volumes. You do not need Node.js, pnpm, or OrbStack on the host.
Before you begin
- Install and start Docker Desktop or Docker Engine with the Compose plugin.
- Obtain the Teloa source code and open the directory containing
compose.yaml. The current setup builds from source; do not assume an official image name. - Make sure the device can download images and software dependencies. Bring your own model service and API key.
Follow the release information on the official website to obtain the source. If you do not have it yet, use the contact channel on the website to check how to access the preview.
docker info
docker compose version
The first command should return details of the running engine; the second should show the Compose version. Use a maintained Docker release that supports health checks and dependency conditions for initialization services.
Start Teloa
Run this command from the source root:
docker compose up -d --buildOn the first start, Docker builds the image, generates a database password, initializes the database, and starts Teloa. The password is stored in a separate volume; you do not need to enter a demo password.
Check the status
docker compose psWait until db and app are healthy. init is a one-time initialization service, so a successful exit is expected. If a service keeps restarting, check the error first. Do not delete the data volumes.
The default local Web port is 3100. The database port is not published to the host. If another service already uses that port, add TELOA_PORT=3101 to .env in this directory, then start Teloa. Do not stop unrelated services.
Open the authentication link
docker compose logs --tail=50 appIn your own terminal, find the full authentication link printed during this startup. If you changed the port, replace the port in the link with your configured host port, preserving all authentication parameters.
Use the new link after a restart. The authentication link is not a model API key. Do not paste logs containing authentication parameters into public issues.
Start working
On your first visit, Teloa may prompt you to add an API key. Configure it there, or choose to set it up later and open Settings → Models. Follow the model guide to verify a response. A working page and a working model are two separate checks.
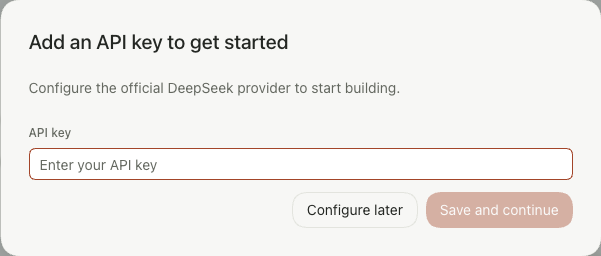
English interface before credential setup. This field needs your model provider’s API key, not the local authentication link from the previous step.
Next, complete your first task or build your first team. The initial environment may be empty; you do not need to import demo data first.
Stop and resume
docker compose stop
docker compose start
Your data stays in the persistent volumes. Local tasks and automations cannot continue while your computer is asleep or shut down, or while Docker is closed. Back up before upgrading. To change the source, see Local development.